Intro
I’ve had the chance to work with Citrix Provisioning Services (PVS) before—not in a shiny greenfield setup, but in an environment I inherited. Still, it stuck with me. Hard.
There’s something beautifully simple about the idea: one master image, streamed everywhere. No chaos, no image spaghetti—just clean, consistent machines and updates that don’t make you question your life choices.
Now, this isn’t going to be a step-by-step guide (and definitely not a programming masterclass). I’m a system engineer—I like things that work, not things that look clever on paper.
Recently, I moved away from Citrix to Parallels RAS—mostly because, well… licensing. You know how that goes. But pretty quickly, I ran into something I hadn’t fully appreciated before: that PVS-style provisioning model? Yeah… not something you just “turn on” in this stack.
We’re currently running Parallels RAS on top of Proxmox. And while Parallels does support image-based provisioning in some scenarios, Proxmox isn’t (yet) one of the lucky ones. So that nice, clean “single master image” approach? Gone.
And that… bothered me more than it probably should have.
Instead of accepting it or waiting for a future feature that may or may not arrive, I decided to take matters into my own hands. The goal was simple:
one master image, automated deployments, and a consistent environment—no compromises.
What followed was a mix of automation, API tinkering, and a bit of orchestration magic. With some help from my good friend Claude and the flexibility of n8n, I ended up building something that brings back a lot of that PVS feeling—just in a Proxmox + Parallels RAS world.
Environment & Requirements
Let’s set the stage.
I’m running a Proxmox cluster where session hosts need to be spread across multiple nodes—for both availability and load balancing. So this isn’t just about spinning up VMs; it’s about doing it in a way that’s consistent, predictable, and repeatable across the entire cluster.
At the heart of it all sits a master image: Windows Server 2025 Datacenter. Fully prepped, optimized, and loaded with everything a session host needs. This is the golden image—the single source of truth.
To keep deployments smooth, I’m using a minimal unattend.xml. Nothing fancy—just enough to skip the OOBE and get the machine up and running without manual clicks. All the real work is already baked into the image.
Which means: what’s in the image is what you get. Everywhere.
But building the image is only half the story—maintaining it is where things get interesting. Updates, config tweaks, software changes… they all need to be applied regularly.
With Citrix PVS, this was almost too easy:
spin up a maintenance version, make your changes, shut it down, promote it—and done. Next reboot, everything’s updated.
Clean. Fast. No drama.
That level of simplicity sets the bar pretty high.
And naturally… that’s exactly what I wanted to recreate here.
Let’s start
You start with a clean, well-prepared Windows Server 2025 image. I won’t go into detail on how to build that part.
What does matter is that the image is properly sysprepped, any attached ISO is removed (this can cause issues when migrating to another Proxmox host), and a simple unattend.xml file is in place.
<?xml version="1.0" encoding="utf-8"?>
<unattend xmlns="urn:schemas-microsoft-com:unattend">
  <settings pass="oobeSystem">
    <component name="Microsoft-Windows-Shell-Setup"
               processorArchitecture="amd64"
               publicKeyToken="31bf3856ad364e35"
               language="neutral"
               versionScope="nonSxS"
               xmlns:wcm="http://schemas.microsoft.com/WMIConfig/2002/State">
      <OOBE>
        <HideEULAPage>true</HideEULAPage>
        <HideLocalAccountScreen>true</HideLocalAccountScreen>
        <HideOEMRegistrationScreen>true</HideOEMRegistrationScreen>
        <HideOnlineAccountScreens>true</HideOnlineAccountScreens>
        <HideWirelessSetupInOOBE>true</HideWirelessSetupInOOBE>
        <SkipMachineOOBE>true</SkipMachineOOBE>
        <SkipUserOOBE>true</SkipUserOOBE>
      </OOBE>
    </component>
  </settings>
</unattend>
Run Sysprep with the generalize option and choose shutdown.
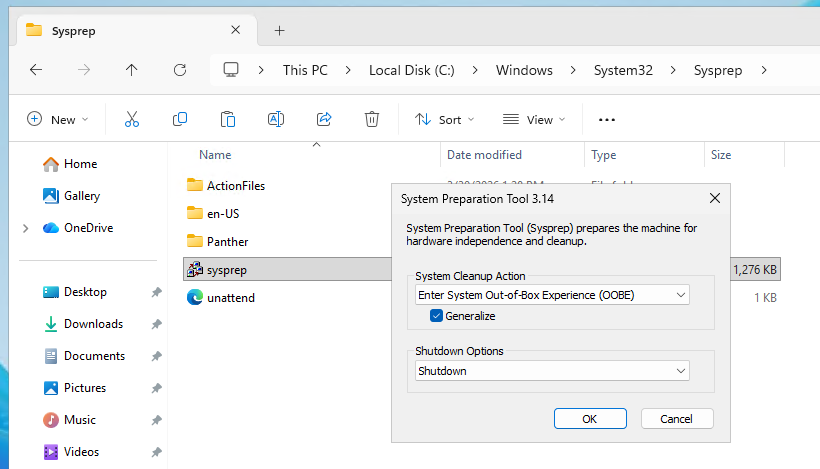
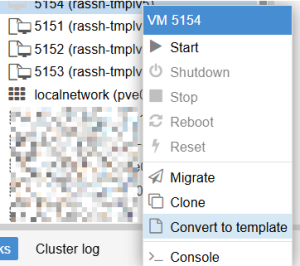
Once the machine has powered off, convert it into a template.
I try to keep my RAS environment clean and easy to navigate.
All my templates use VM IDs in the 5151–5199 range, while my session hosts start from 5201–5299. This simple numbering scheme makes it immediately clear what’s what and helps keep things organized as the environment grows.
And now the fun part
I’ve built three flows in n8n—well, to be fair, Claude did most of the heavy lifting based on my input.
- Flow 1: Deploys new session hosts based on the template
- Flow 2: Handles the configuration of those session hosts
- Flow 3: Recreates a fresh, clean image every morning
Bonus: I (well… Claude) also put together a simple webpage to make everything a lot easier—so I no longer have to mess around inside the flows themselves.
This setup keeps the environment consistent, automated, and—most importantly—easy to maintain.
Flow 1: Builder workflow
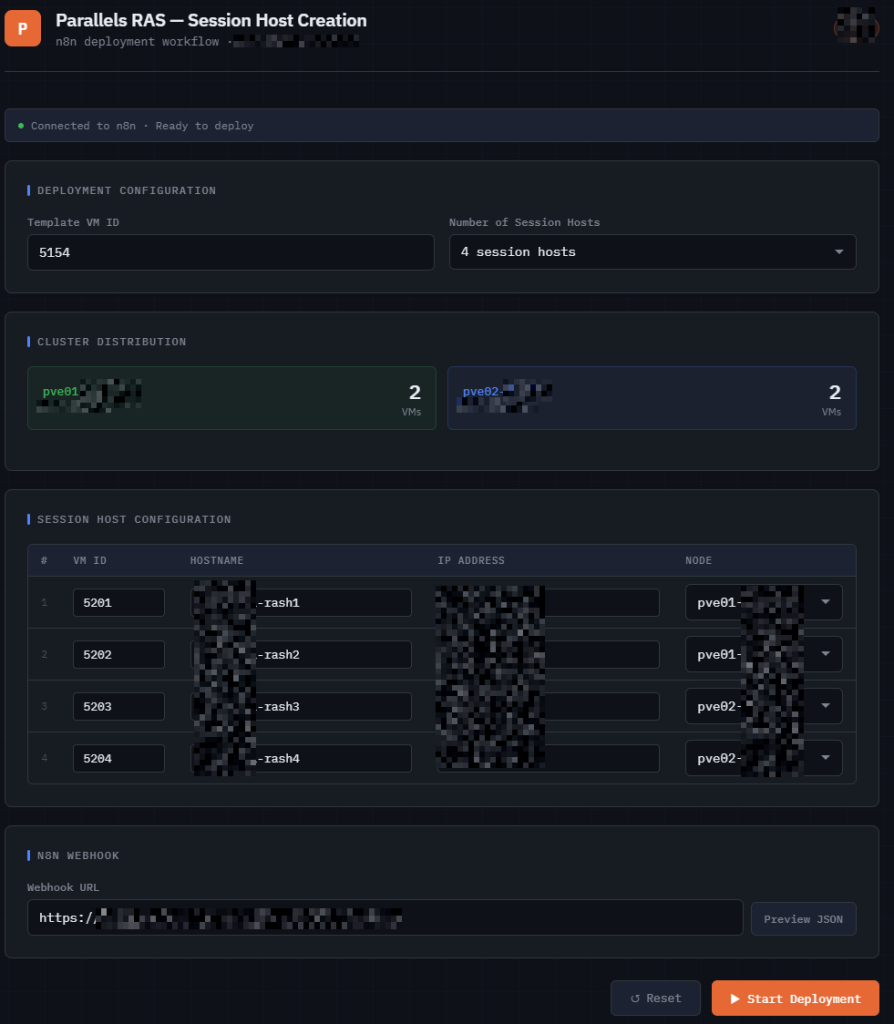
This screenshot shows the front-end I (Claude) built on top of my n8n flow—basically a simple UI that turns what used to be manual JSON editing into a clean deployment experience.
Instead of opening n8n and tweaking inputs inside the workflow, I can now just fill in a form and hit “Start Deployment”. The page takes care of building the request and sending it to the webhook.
At the top, I define the template and how many session hosts I want.
That alone is enough to generate the base of the deployment.
Next, I decide how the workload is distributed across nodes. This is important, because the flow will later use this information to either deploy directly to the right place—or migrate the VM after creation.
The main table is where everything comes together. For each session host, I define:
- the VM ID
- hostname
- IP address
- target node
What makes this even easier is that the UI already pre-populates everything for me:
- VM IDs are suggested based on my numbering scheme
- Hostnames are generated automatically
- IP addresses are pre-filled
I can still tweak everything if needed, but in most cases it’s just a quick review instead of manual input.
This table is effectively the input dataset for the automation.
When I click the button, the UI sends a POST request to the n8n webhook with all this data.
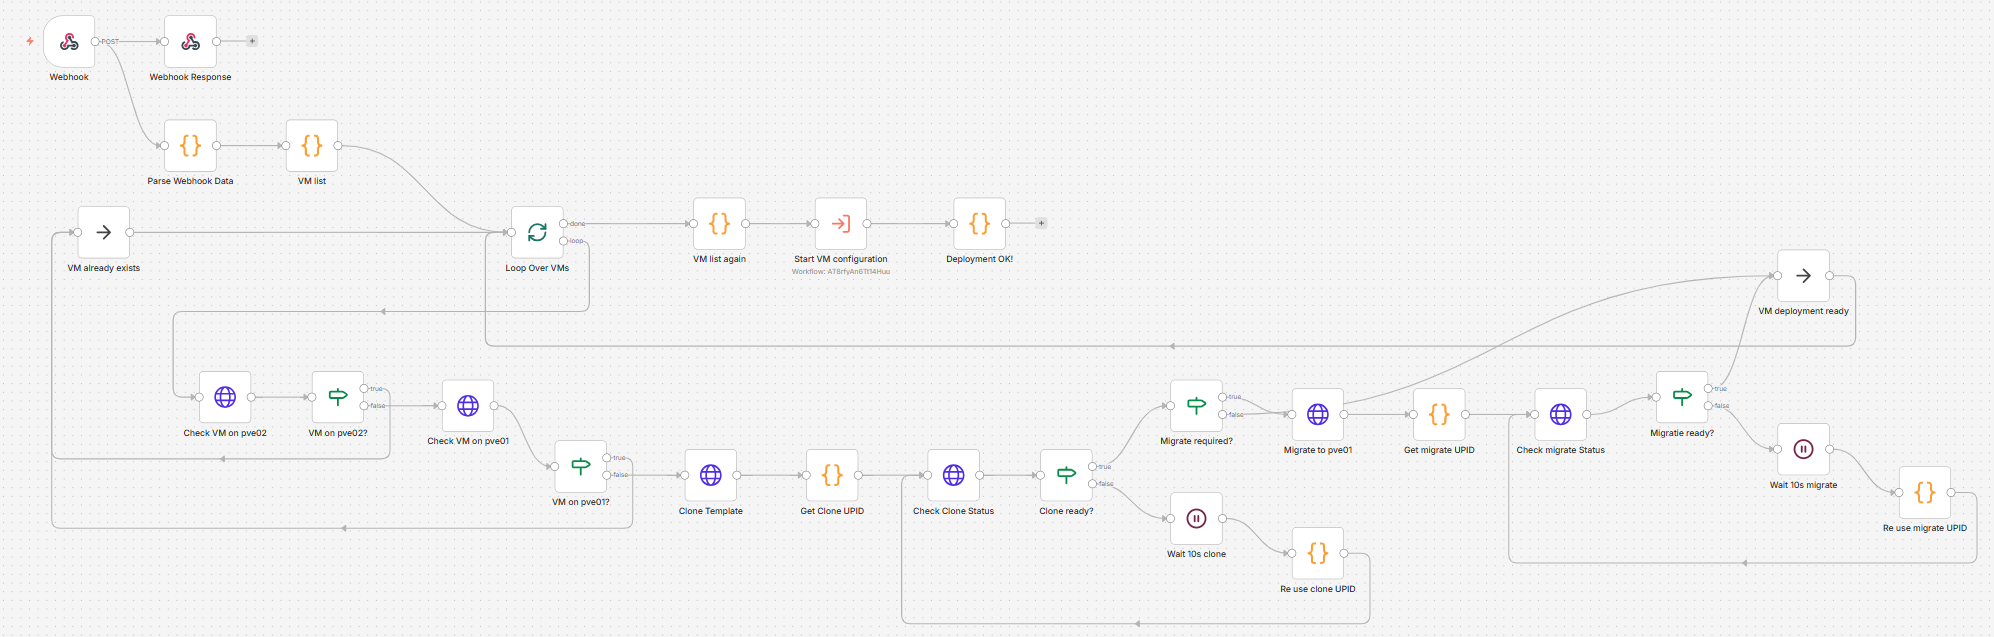
From there, the flow:
- checks if the VMs already exist
- clones them from the template if needed
- waits for completion
- migrates them to another node if required
- and finally triggers the configuration workflow
This UI removes the last bit of friction.
No more:
- editing JSON manually
- opening n8n for every deployment
- or risking small mistakes in the flow
Instead, I get a repeatable, controlled deployment process—with just a few clicks.
Flow 2: Configuration workflow

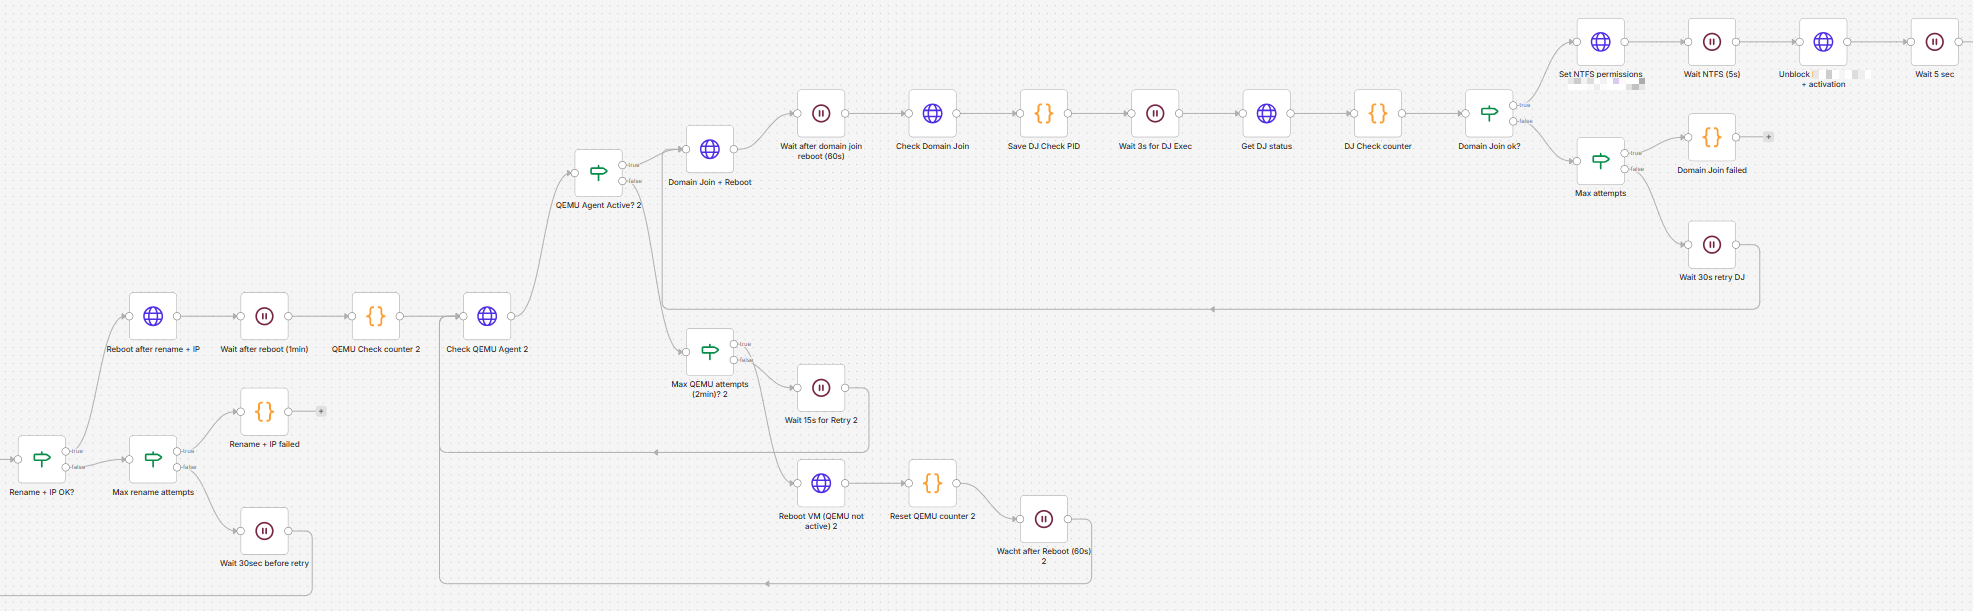

This workflow automates the complete lifecycle of provisioning a virtual machine — from initial boot to a fully configured and integrated server.
The goal? Zero-touch deployment, with built-in validation, retry logic, and error handling.
The text below was written entirely by AI, based on my workflow.
I basically threw a pretty complex automation at it, and it turned it into something readable for humans.
The logic is still mine, but the explanation and wording are 99% AI.
🧩 1. Trigger & Base Configuration
The workflow starts with a trigger that passes key parameters such as:
- VM ID
- Target host/node
- Hostname
- IP address
These values are then used to immediately configure the VM (CPU, memory, name, and guest agent settings).
⚡ 2. Smart VM Startup
Before doing anything else, the workflow checks whether the VM is already running.
- If it is → continue
- If not → start the VM and wait for the OS to boot
This avoids unnecessary restarts and makes the flow idempotent.
🔌 3. Waiting for Guest Agent Availability
The workflow continuously checks if the guest agent inside the VM is available.
This is a critical step because all further configuration is executed inside the VM, via this agent.
To make this reliable:
- A retry loop is implemented
- There’s a maximum attempt threshold
- If needed, the VM is rebooted automatically
👉 This ensures the workflow doesn’t fail just because the OS isn’t ready yet.
🖥️ 4. Initial OS Configuration
Once the agent is available, the workflow configures the operating system:
- Renames the computer
- Assigns a static IP address
- Configures DNS servers
After that, it verifies whether both the hostname and IP were applied correctly.
If not:
- It retries multiple times
- Eventually fails gracefully if the limit is reached
🔁 5. Controlled Reboot & Revalidation
After applying system changes, the VM is rebooted.
The workflow then:
- Waits for the system to come back online
- Re-checks agent availability
- Ensures the system is ready for the next step
🏢 6. Domain Join Automation
The VM is automatically joined to a domain.
This includes:
- Triggering the join operation
- Rebooting the VM
- Verifying domain membership afterward
A retry mechanism ensures this step succeeds even in less stable conditions.
🔐 7. Post-Deployment Configuration
Once domain-joined, additional configuration is applied:
- File system permissions are set for our ERP software
- Required application files are configured
- RMM is being installed
These steps prepare the machine for production use.
🧱 8. Integration into Application Platform
The VM is then integrated into the Parallels RAS console
The workflow:
- Registers the server
- Applies initial configuration (disabled state, etc.)
- Verifies that required services are present
If verification fails:
- It retries the registration process
- Stops after a defined number of attempts
📸 9. Snapshot Management
Before finishing, the workflow ensures a clean baseline snapshot exists:
- Checks for an existing snapshot
- Removes it if necessary
- Creates a new “baseline” snapshot
This allows quick rollback later.
✅ 10. Final Result
If all steps succeed, the workflow returns a success message indicating that the VM is fully deployed and ready.
If any step fails:
- A clear error message is returned
- The process stops gracefully
💡 Why this workflow stands out
What makes this flow powerful isn’t just automation — it’s resilience:
- ✔️ Idempotent design (safe to re-run)
- ✔️ Built-in retries and validation loops
- ✔️ Self-healing behavior (reboots when needed)
- ✔️ End-to-end automation (infra → OS → app layer)
Flow 3: Nightly revert to baseline snapshot
Back when I was working with Citrix PVS, all session hosts were rebooted every night.
The idea was simple: start each day with a clean, fresh image so everything stayed consistent and any drift or issues were wiped out automatically.
To replicate that same “fresh start every day” approach in this environment, I built the workflow below.
It automates the entire process — making sure each machine ends up in a known-good state without any manual intervention.

Every night at 02:50, the flow kicks off automatically and does the following:
First, it retrieves a list of all virtual machines and filters out only the session hosts based on a naming convention and ID range. This ensures only the intended machines are touched.
Next, all those session hosts are cleanly shut down. The workflow then waits a bit and double-checks whether everything is actually powered off. If not, it simply loops and checks again until all machines are confirmed stopped.
Once everything is offline, each VM is rolled back to a predefined “baseline” snapshot. This is the key part: instead of just rebooting, every machine is effectively reset back to a clean state — just like with PVS.
After the rollback, the workflow verifies whether all operations succeeded. If something failed, it reports which machines had issues.
If everything looks good, all VMs are started again. The flow waits for them to boot and then performs one final check to confirm that every session host is up and running.
If some machines didn’t start properly, it retries automatically until everything is back online.
In short: every night, all session hosts are shut down, reset to a clean snapshot, and brought back online — giving you that same “fresh image every day” feeling, but without needing Citrix PVS.
Final thoughts
In the end, this wasn’t really about replacing Citrix PVS.
It was about recreating a way of working that just makes sense: predictable systems, clean states, and deployments you don’t have to babysit.
Is it exactly the same as PVS? No. And it probably never will be.
But honestly—that’s fine.
What I ended up with is something that fits my environment better:
- It works with Proxmox
- It gives me full control over the lifecycle of every VM
- It can easily creates/deploys a new image.
- It removes manual work and uncertainty
There’s no magic checkbox here. No “enable provisioning mode” button.
Just a combination of APIs, automation, and a bit of stubbornness.
And maybe that’s the real takeaway.
You don’t always need the perfect feature built into your platform. Sometimes, you can just build what you’re missing—exactly the way you want it.
Would I still use PVS if it were available in this stack? Probably, yes.
But until then, this gets me 90% of the experience… with 100% understanding of how it actually works under the hood.
And that, as a system engineer, is arguably even better.